As you commence on residential roof installation, begin by selecting appropriate materials like asphalt shingles for cost-effectiveness or metal roofing for durability. Inspect your roof thoroughly to identify any issues and understand the extent of work needed. Acquire necessary permits to adhere to regulations and safeguard safety. Coordinate the installation date considering weather conditions. Prepare your property meticulously before the tear-off phase, preserving your surroundings. After installation, a final inspection will be conducted to ensure quality workmanship. Further insights await to enhance your understanding of the intricate process for a durable and reliable roof.
Key Takeaways
- Roofing material selection based on climate and architecture.
- A thorough roof inspection to identify damage and issues.
- Obtain necessary permits and approvals for legal work.
- Coordinate installation date considering weather and materials.
- Prepare property, execute tear-off, and complete final inspection for clean-up.
")
Roofing Material Selection
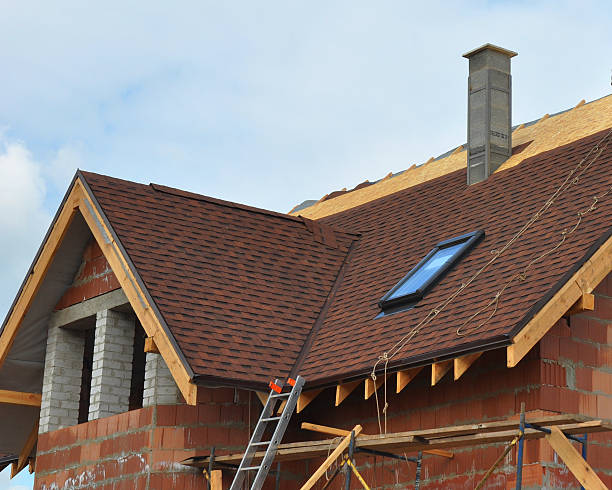
When selecting roofing materials for your residential roof installation, take into account the climate and architectural style of your home to ensure durability and aesthetic appeal.
In regions with high precipitation levels, materials like asphalt shingles, metal roofing, or tiles are often preferred due to their ability to withstand moisture and prevent leaks.
Consider the architectural style of your home when choosing roofing materials. For traditional or colonial-style homes, cedar shake shingles can enhance the classic charm of the property. Modern houses often pair well with metal roofing for a sleek and contemporary look. Spanish or Mediterranean-style homes typically feature tiles that complement the overall aesthetic and provide a touch of authenticity.
In addition to climate and architectural style, it’s important to evaluate the durability and maintenance requirements of each roofing material. Asphalt shingles are a popular choice due to their affordability and ease of installation, but they may require more frequent replacement compared to metal or tile options. Metal roofing, while initially more expensive, offers exceptional longevity and low maintenance, making it a cost-effective choice in the long run.
Roof Inspection and Assessment
During a roof inspection and assessment, meticulous attention is paid to the condition of the roofing structure and materials to secure peak performance and longevity. This pivotal step involves a thorough examination of the roof’s current state to identify any existing issues or potential problems that could impact the installation process or the roof’s durability in the future.
Roof inspectors typically start by visually inspecting the exterior of the roof, checking for signs of damage such as cracks, missing shingles, or sagging areas. They also examine the condition of the gutters, flashing, and eaves to ensure proper drainage and prevent water damage. Additionally, inspectors may climb onto the roof to assess its overall integrity and look for any hidden damages that may not be visible from the ground.
Moreover, a detailed assessment of the roofing materials is conducted to determine their quality and suitability for the specific installation project. This includes checking the condition of the underlayment, insulation, and any existing roofing layers. By evaluating the materials, inspectors can recommend the best course of action to secure a successful roof installation that will withstand the test of time.
In essence, the roof inspection and assessment serve as a foundation for the entire installation process, providing valuable insights that help contractors make informed decisions and deliver high-quality results.
Obtaining Permits and Approvals
Acquiring the necessary permits and approvals is an essential initial step in the residential roof installation. Before any work can commence on your new roof, it’s imperative to confirm that all required permits and approvals are in place. These permits are critical as they certify that the installation meets all local building codes and regulations, ensuring the safety and integrity of your home.
To initiate this process, you or your roofing contractor will need to submit detailed plans and specifications to the relevant local authorities for review. This submission will outline the scope of the project, the materials to be used, and how the installation will comply with building codes. The authorities will then evaluate these documents to confirm they meet all requirements.
Once the plans are approved, the permits will be issued, allowing the roofing work to proceed legally. It’s important to have these permits prominently displayed at the work site throughout the installation process. Failure to obtain the required permits can result in fines, delays, or even having to undo completed work.
Scheduling the Installation Date
To ensure a smooth transition from the permit acquisition phase, the next essential step in the residential roof installation process is coordinating and confirming the installation date. This phase is vital to make sure that all necessary preparations are made for the seamless execution of the installation. Once you have selected a reputable roofing company and finalized the contract details, the next step is to collaborate with the company to schedule a suitable date for the installation.
When scheduling the installation date, it’s important to take into account various factors, such as the weather conditions, availability of materials, and the roofing company’s workload. Communicating your preferred dates and any constraints you may have will assist in finding a mutually convenient time for the installation to occur.
Once a date is agreed upon, make sure to confirm all the details with the roofing company to avoid any last-minute changes or delays. It’s also advisable to prepare your property for the installation process by ensuring clear access to the roof and removing any obstacles that may impede the work.
Roof Preparation and Tear-Off
Effectively preparing the roof and conducting the tear-off establishes the groundwork for a successful residential roof installation process. To ensure a smooth change from the old to the new, follow these key steps:
- Clearing the Area: Before commencing the tear-off process, it’s essential to clear the area around your home. Remove any vehicles, patio furniture, or other items that could impede the roofing team’s access to the roof. This step helps prevent any accidents and maintains a safe working environment.
- Protecting the Surroundings: To safeguard your property during the tear-off, professionals typically use tarps or plywood to cover landscaping, windows, and other vulnerable areas. This precautionary measure prevents debris from damaging your garden or siding, preserving the integrity of your home’s exterior.
- Tear-Off Execution: The tear-off phase involves stripping the old roofing materials down to the roof deck. This process requires precision and care to avoid damaging the underlying structure. Experienced roofers use specialized tools to effectively remove the old shingles, underlayment, and flashing, preparing the roof for the installation of new materials.
Roof Installation Process
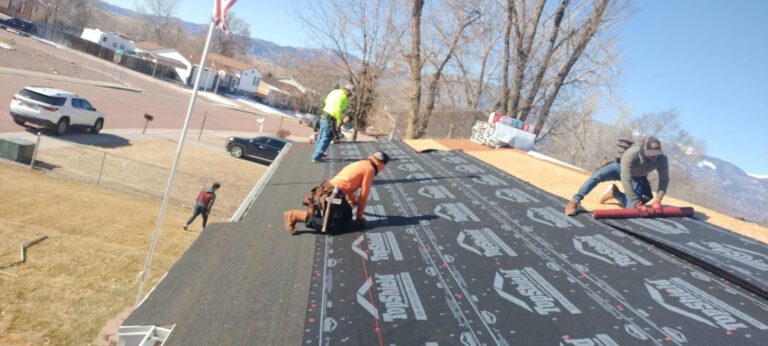
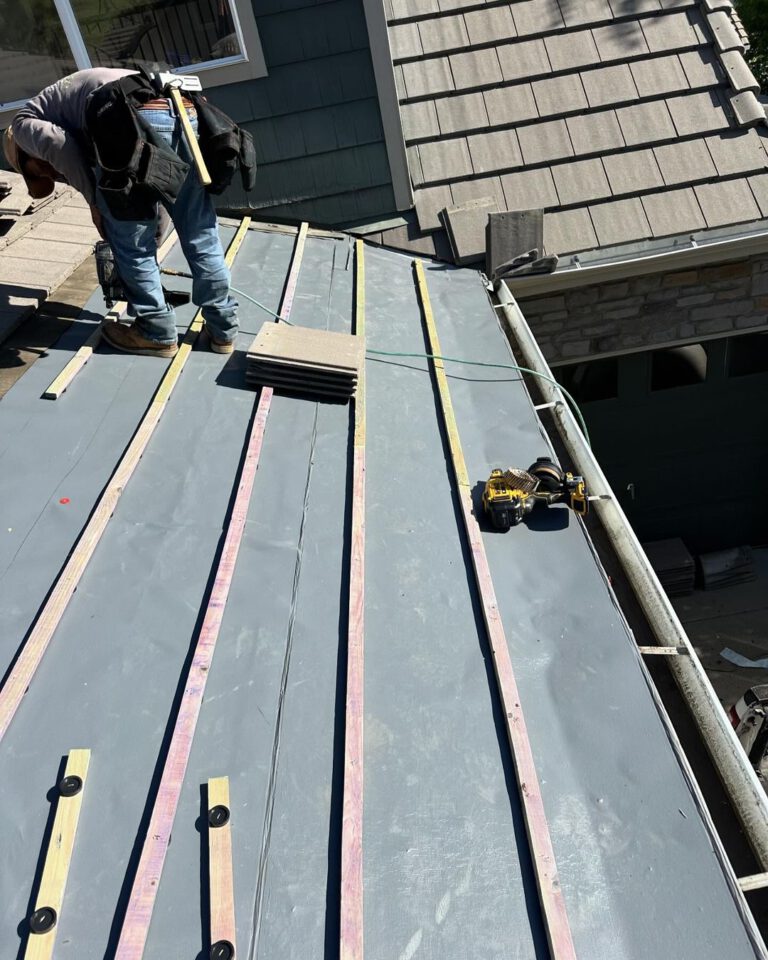
Start by meticulously aligning the new roofing materials with precision and care during the roof installation process. This step ensures the foundation of your roof is solid and sets the stage for a successful installation.
Next, the underlayment is applied, serving as a vital barrier against water infiltration. This pivotal layer enhances the roof’s durability and weather resistance.
Once the underlayment is in place, the shingles are carefully installed, starting from the bottom and working your way up. Each shingle is strategically positioned and secured to create a seamless and visually appealing final product. Paying attention to the details during this phase is essential for a long-lasting and aesthetically pleasing roof.
Flashing is then added to areas such as valleys, vents, and chimneys to prevent water penetration and reinforce the roof’s structure. Properly installed flashing provides an additional layer of protection in vulnerable spots, ensuring your roof can withstand the elements.
Final Inspection and Clean-Up
Upon completing the roofing installation, take the time to conduct a thorough final inspection and ensure meticulous clean-up of the work area. This step ensures that the project isn’t only completed but done so to the highest standards. Here’s what you should focus on during the final inspection and clean-up:
- Inspection: Walk around the entire perimeter of your home, checking for any missed nails, debris, or potential issues. Inspect the roof surface for proper shingle alignment, secure flashing around chimneys and vents, and make sure no areas are left exposed to the elements.
- Gutter Check: Examine the gutters and downspouts for any leftover materials or debris that may have accumulated during the installation process. It’s essential to confirm that the gutters are clear and free-flowing to prevent potential water damage.
- Yard Clean-Up: Pay attention to the surrounding yard and landscaping. Remove any fallen shingles, nails, or packaging materials that may have made their way onto the ground. A tidy yard not only enhances the aesthetics of your property but also avoids any safety hazards.
Wrap-UP
Now that you have grasped the process of residential roof installation, you can confidently tackle your next roofing project.
Remember, selecting the appropriate materials and ensuring proper permits and inspections are crucial for a successful installation.
So, don’t hesitate to roll up your sleeves and get to work – before you know it, you’ll have a roof over your head that’s as solid as a rock.
Happy building! and also, explore our additional sites: Colorado Springs, Castle Rock, and Falcon.